Screen recording is one of today’s phones’ most essential built-in functions. Would it be a good idea for you to use your wireless to clarify specific exercises or processes, as you can merely touch a picture to record your screen? Apple has made it easier to record a screen on the iPhone 12 than in the previous two or three years. Nonetheless, finding the controls might be a challenge from the start. Fortunately, a few key advancements have made it possible for anyone to record video of everything that happens on the iPhone 12’s screen while listening to music. Except for if it’s damaged in settings, a backup course of action image for the screen recording capability usually is visible in the Control Center on an iOS device.
The ability to record the screen of your iPhone or iPad is also one of the best features in iOS gadgets, specifically to record video on iPhone 12. In September of 2020, Apple released iOS 14, which included a few new features like Home Screen Widgets, the App Library, and more modest Siri collaboration and calls, as well as massive enhancements to Apple Maps and Messages. In any case, screen recording has been possible on iPhone models since iOS 11. Previously, capturing the screen necessitated jailbreaking the iPhone or collaborating with a PC and using untouchable apps. As a result, it was pretty clunky. We’ve also ordered and fanned out a small demo for your reference if you’re considering how to capture your screen iPhone 12 genius max. Here’s all you need to record your iPhone 12’s screen.
How to Add Screen Record in iPhone 12
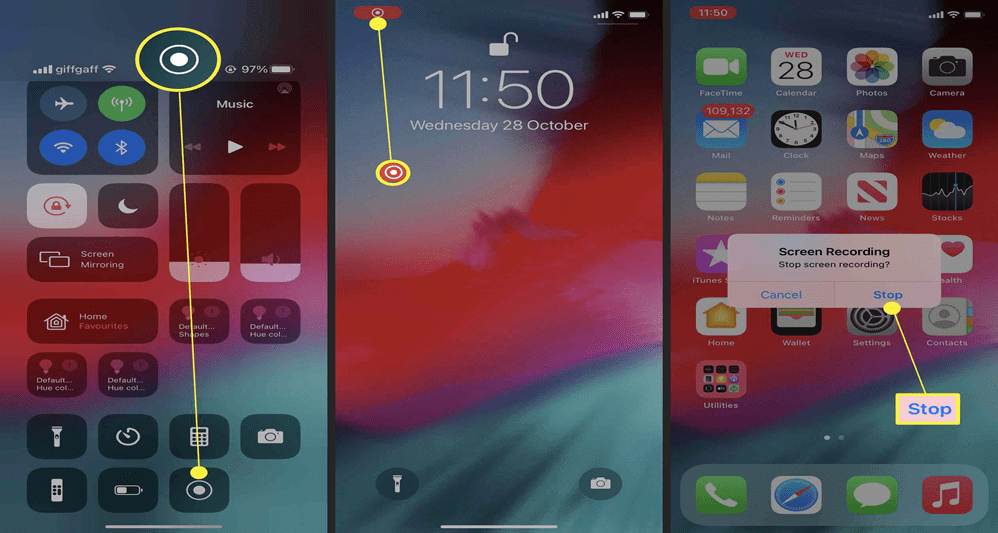
Setting up the iPhone Control Center is essential before recording the screen on an iPhone 12. After some time, accessing this section is as simple as a swipe and a touch. To enable this option, users must open the Settings app, navigate to the ‘Control Center’ section on the left, and select ‘More Controls’ to see all available options. Select ‘Screen Recording’ from the drop-down menu to enable this feature. The decision to obtain a video will be implemented right away. Swiping down on the right side of the screen from the top edge of the iPhone reveals the Control Center, and the screen recording image appears to be a solid circle with the format of a process. It’s similar to the screen button on the iPhone camera, although it’s less noticeable. While recording the screen, a few options are available that may be accessed with a long press.
How to Screen Record on iPhone 12
The following advancements will enable screen recording on the iPhone 12 and other iOS gadgets with comparable iOS versions. Genuine screens and menu items may differ between device models in any case.
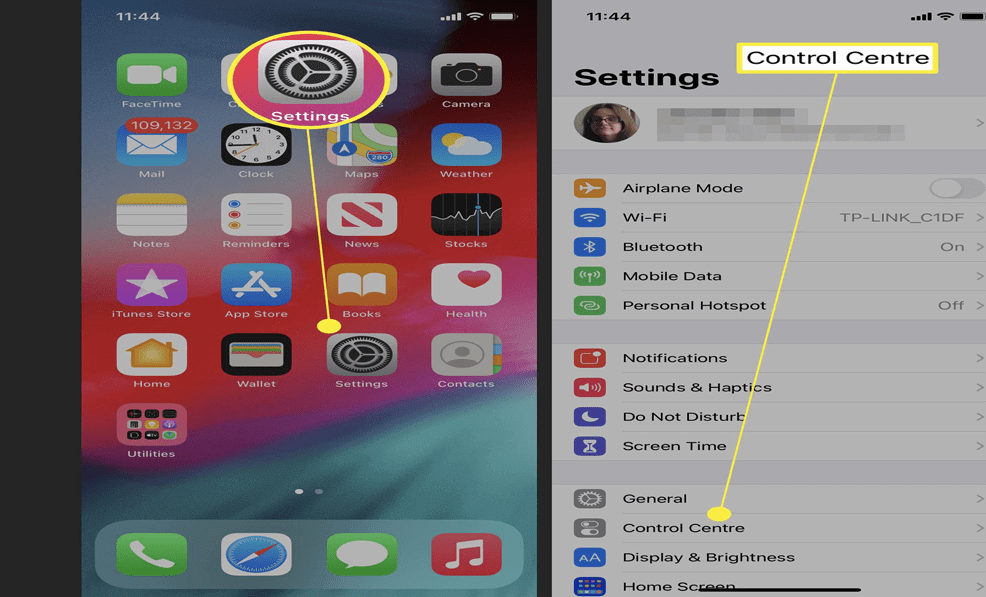
Step 1: Check your iPhone’s settings and make sure that screen recording is enabled in the Control Center, along with various additional ways icons. Go to the Home screen to do so and tap the Settings icon.
Step 2: If the screen recording sign isn’t already there in Control Center, you can add it in the Settings application. Open the Settings app, select Control Center, and “Redo Controls” from the drop-down menu.
Step 3: To enable screen recording, tap the plus sign (+) next to Screen Recording. You should now see a Screen Record Sign in the Control Center, which you can get by sliding down from the upper-right edge of your iPhone screen.
How to Screen Record on iPhone 12 (with sound)
You don’t even need a great screen recorder application or sound annual programming if you want to record your screen. Macintosh provides a free mechanical assembly for iOS and iPad that you can install in the Control Center of the iPad or iPhone to record the screen with sound. If your iPhone’s ringer is turned on, an iPhone screen recording will record the inside solid. During the screen recording, you can also record your voice. Could we begin by discussing how to screen record with or without sound, including the structure and outside sounds? For the most part, here are the appropriate responses to the inquiries you’ve been seeking for.
Limitations for Screen Recording
Screen recording isn’t going to work everywhere. Typically, this occurs when specific programs place value-based barriers in the way of copy-protected content being played. If this happens, Screen Recording may fail to start, the application you’re attempting to record may postpone or freeze, or the annal may finish with an error message. If Screen Recording had usually been working for some time and then suddenly stopped, rebooting your iPhone might be justified. That should more than likely help with any issues preventing Screen Recording from working correctly.
Hold down the Power and Volume buttons till the power off slider appears. Swipe the slider from the left to the option to control your iPhone. To restart your iPhone, tap and hold the Power button once again after being killed. Accepting that the clarification was a slight oversight, Screen Recording should work flawlessly with iPhone 12. For example, you can’t utilize Screen Recording while listening to music or managing accounts in the Music app. Screen Recording issues that are isolated to a single program strongly suggest that this is the case. Regrettably, you may be unable to address it.
How to Adjust Screen Recording Settings
When recording on the iPhone 12, the default setting is to combine any sound currently playing on the device. This is a delightful touch, and the natural beneficiary can, of course, record live Sound in the same way. Discovering how to use an app for a sidekick or accomplice accurately illustrates mic usage. Any sound from the phone is mixed in, so leaving a remark on a video is another option. Although the instruments are self-evident, here’s a quick rundown if you’re unfamiliar: The top of the page displays the fix and retry attempts. In contrast, the bottom of the page shows several markup styles and devices, as well as a shading picker. If you tap the “+” icon, you’ll find similar options for adding text, a signature, a magnifier, fogginess, and whatever else you can think of.
You’ll be shown the below screens if you opt to change or markup your screen capture. The screen you want to capture, modify/markup display, and decide to save or delete the screen captures are shown from left to right. Assuming the page, you’re screenshotting keeps it up to date. You’re also ready to switch between “Screen” and “Full Page.” This feature of Safari allows you to instantly save a screen capture of the entire Safari page as if you had gone right to the bottom and screenshotted it completely. This is useful for web development or design work.


